Beginner's Guide
Using Your Telescope - Operation

|
|
Telescope operation |
What we will cover
In the first section we discussed the various accessories to make observing more enjoyable. Now we will discuss the actual operation of your telescope. This includes setting things up and tips to make your viewing more enjoyable. We especially you value the advice since these are things that cost nothing other than the time to learn.
Utilize the daytime
We can't stress enough that you should not wait for a clear night to learn how to set up your telescope. You'll want to do as much as possible during the daytime because it will be a lot more difficult at night. Here are some of the things you can do:
Assemble your telescope. We're not just talking about the initial assembly. Sometimes your telescope cannot be stored all in one location fully assembled. Often the telescope tube must be separated from the mount both because of room and sometimes weight. Make sure you can do this reasonably because everything is always more difficult at night and this way you have familiarity.
 Align your finder scope. For your finder scope to be usable it has to be aligned with the main scope. That means they are both
pointed at the same position in the sky. In other words if you look through your finder at a star and put it in the crosshairs, it will
be visible in the main scope. You can do this during the day if you point your telescope at a object that is at least 150 feet away.
Align your finder scope. For your finder scope to be usable it has to be aligned with the main scope. That means they are both
pointed at the same position in the sky. In other words if you look through your finder at a star and put it in the crosshairs, it will
be visible in the main scope. You can do this during the day if you point your telescope at a object that is at least 150 feet away.
The convenient object in the photo is the chimney flue on the roof of the house. This will be our target.
 The technique is to look through the main scope and find this reasonably distant object and put it in the middle of the field of view.
You do not have to use a high power eyepiece and we actually recommend your normal low power eyepiece which you usually use to find
objects before switching to higher power. Then look through the finder scope. If it's already in the crosshairs, it's already aligned! However, the
odds of that are pretty slim. Hopefully you can see your target in the FOV of the finder. You then use the set screws on the finder
scope mount to put the object right on the crosshairs.
The technique is to look through the main scope and find this reasonably distant object and put it in the middle of the field of view.
You do not have to use a high power eyepiece and we actually recommend your normal low power eyepiece which you usually use to find
objects before switching to higher power. Then look through the finder scope. If it's already in the crosshairs, it's already aligned! However, the
odds of that are pretty slim. Hopefully you can see your target in the FOV of the finder. You then use the set screws on the finder
scope mount to put the object right on the crosshairs.

Not aligned.

Aligned.
Note: This same technique will work with a Telrad or other 1X finders, but you'll need to turn the red light to maximum, especially if it's a sunny day.
Plan your observing session. Some of your observing doesn't really need any planning. You take your scope out, see Jupiter, point your scope at it and observe. But often advanced planning allows you to both save time and not miss events. If you're looking for faint Messier or NGC objects, you probably should plan on how you're going to find it.
Traveling to an observing site. Planning goes to another level when you aren't near home. Dressing warm and having additional clothing layers available is a must. The rule is bring more clothing than think you'll need. You're not only going to be out in the cold (most of the time), but you don't have the benefit of being able to move around. Bring along a beverage, bring along a snack. And though this may sound silly, don't forget to check the moon phase, paying attention to when it will rise and set.
Setting Up Your Telescope
All telescopes must be set up. Even a permanently mounted telescope in an observatory will need to be set up at least once. But portable telescopes this needs to happen any clear night when you're going to observe. Since there are two major kinds of telescope mounts, we'll discuss them separately.
Alt-Azimuth
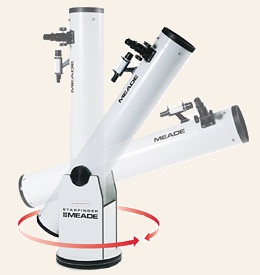 Setting up an alt-azimuth mount is as simple as it gets. You simply find a flat area for the tripod or base if it's a Dobsonian.
The motions of this type are simple: it moves in azimuth (the red circle
with arrows in the picture to the right) and altitude (shown by the
various positions of the telescope tube. For visual use that is all there's to it.
Setting up an alt-azimuth mount is as simple as it gets. You simply find a flat area for the tripod or base if it's a Dobsonian.
The motions of this type are simple: it moves in azimuth (the red circle
with arrows in the picture to the right) and altitude (shown by the
various positions of the telescope tube. For visual use that is all there's to it.
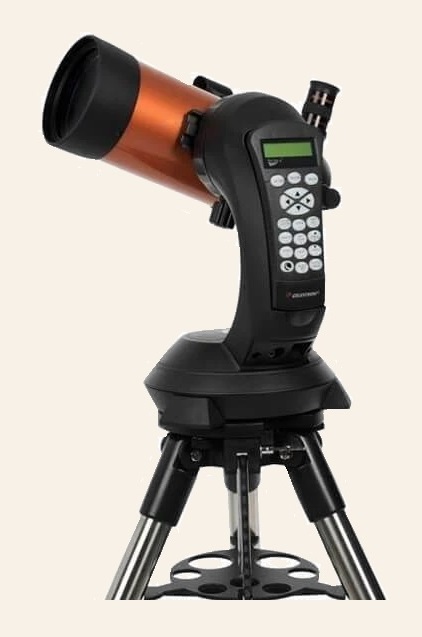 But we now have GoTo scopes that sit on alt-azimuth mounts that have drives in both altitude and azimuth. Via computerization which controls those
drives, even an alt-azimuth can be trained to follow the stars, moon, and planets as they move in the sky because of the Earth's rotation. And they
have the ability to automatically slew to an object in their database. But before they can do these things, the telescope must be "aligned" which means
the computer needs to learn the orientation of the scope to the sky.
But we now have GoTo scopes that sit on alt-azimuth mounts that have drives in both altitude and azimuth. Via computerization which controls those
drives, even an alt-azimuth can be trained to follow the stars, moon, and planets as they move in the sky because of the Earth's rotation. And they
have the ability to automatically slew to an object in their database. But before they can do these things, the telescope must be "aligned" which means
the computer needs to learn the orientation of the scope to the sky.
Alignment
A telescope with a GoTo telescope system needs some basic information - location, date, and time. Depending on the manufacturer and mode, most GoTo telescopes simply want the name of a nearby city chosen from a database, but you can also enter the latitude and longitude. The date and time tell the system what objects are visible when and where you are. But there are GPS-equipped GoTo telescopes take data collection to the next level, using their connectivity to enter the location, date, and time for you.
 The next step is the actual alignment. This process varies a bit
depending on the manufacturer, but the process usually works as follows. You point the telescope at a bright star
by selecting it
in the computers database. The telescope will then slew to a position not
too far away from that star depending on how good the date, time, and location information
are.
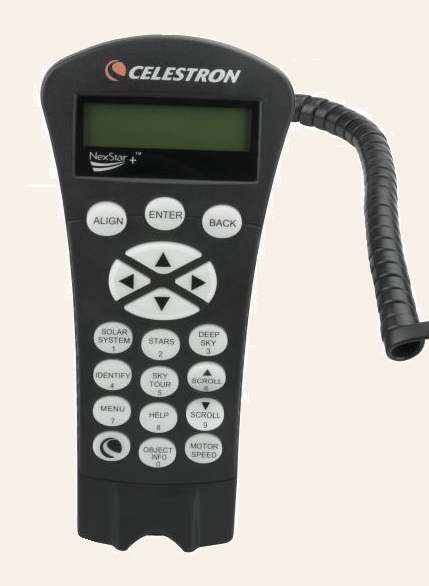
Your task then is to then "move" the scope via the controls and center that star in the field of the telescope.
If it's too far away you may need the help of the finder scope. Once
centered in the main telescope, you hit a button which tells
the computer that this is the actual location of that star. (On the
Celestron model shown to the right, it's the ALIGN button.) You then select
another star. It is generally best to select a star that is in
another part of the sky. The telescope will then slew to that star. Once again
it will probably not be centered so again you center that star and then tell the computer it's aligned. At this point
your telescope might be adequately aligned, but you'll want to do at least one more alignment operation using yet another star. It's possible that
star might be perfectly aligned, but if it's not, center that star. Generally by the 4th star your telescope will be adequately aligned. This
technique is often known as "2 Star Alignment," but it's rarely accomplished with just 2 unless the
initial alignment was already pretty good.
The next step is the actual alignment. This process varies a bit
depending on the manufacturer, but the process usually works as follows. You point the telescope at a bright star
by selecting it
in the computers database. The telescope will then slew to a position not
too far away from that star depending on how good the date, time, and location information
are.
Your task then is to then "move" the scope via the controls and center that star in the field of the telescope.
If it's too far away you may need the help of the finder scope. Once
centered in the main telescope, you hit a button which tells
the computer that this is the actual location of that star. (On the
Celestron model shown to the right, it's the ALIGN button.) You then select
another star. It is generally best to select a star that is in
another part of the sky. The telescope will then slew to that star. Once again
it will probably not be centered so again you center that star and then tell the computer it's aligned. At this point
your telescope might be adequately aligned, but you'll want to do at least one more alignment operation using yet another star. It's possible that
star might be perfectly aligned, but if it's not, center that star. Generally by the 4th star your telescope will be adequately aligned. This
technique is often known as "2 Star Alignment," but it's rarely accomplished with just 2 unless the
initial alignment was already pretty good.
Field Rotation
Unfortunately, though a GOTO system on an alt-azimuth mount will automatically follow an object in the field, it will suffer from field rotation. Here are three images of the constellation Orion over a 10 hour period from when it rises in the east, seen in the direct south, and when it's setting in the west.

Orion rising in the east

Orion directly in the south

Orion setting in the west
Equatorial
, CC BY 2.5 <https://creativecommons.org/licenses/by/2.5>, via Wikimedia Commons") Setting up an telescope with an equatorial mount to the beginner is going to seem a little complicated. It's certainly not the simple process
that you use in setting up a alt-azimuth or Dobsonian. The mount shown at the right is an example of a German equatorial and it's one of the
most common types of mounts and can look needlessly complicated to the
beginner. But everything has its purpose.
Setting up an telescope with an equatorial mount to the beginner is going to seem a little complicated. It's certainly not the simple process
that you use in setting up a alt-azimuth or Dobsonian. The mount shown at the right is an example of a German equatorial and it's one of the
most common types of mounts and can look needlessly complicated to the
beginner. But everything has its purpose.
The design of an equatorial mount allows the telescope to follow the motion of an object in the sky. This is simply accomplished by moving the telescope just along the right ascension (RA) axis. To then automatically follow that object a motor can be attached to that axis. This device is called a clock drive. But it gets better. An equatorial mount also rotates the telescope exactly the amount needed to keep an object oriented in the same position so image rotation is not an issue.
Fork Mount Equatorial
 The fork mount equatorial is quite a bit simpler than the German equatorial. The "forks" point toward the North Celestial Pole and it is much
easier to visualize the movements. And it's a much simpler construction and much lighter in weight. It was a very popular design for
Schmidt-Cassegrains because of the short tube length of those scopes. But the popularity has waned considerably and now those same telescopes
normally come with a German mount. The reason is a telescope is much easier to balance with a German mount. Imaging equipment often has substantial
weight and even modern eyepieces can be extremely heavy also giving balancing problems.
The fork mount equatorial is quite a bit simpler than the German equatorial. The "forks" point toward the North Celestial Pole and it is much
easier to visualize the movements. And it's a much simpler construction and much lighter in weight. It was a very popular design for
Schmidt-Cassegrains because of the short tube length of those scopes. But the popularity has waned considerably and now those same telescopes
normally come with a German mount. The reason is a telescope is much easier to balance with a German mount. Imaging equipment often has substantial
weight and even modern eyepieces can be extremely heavy also giving balancing problems.
But you will still see this mount offered, though normally a single fork and smaller telescopes. However, they are meant to be oriented in the alt-azimuth model. This is because they are oriented to visual use. See a picture in the Alt-Azimuth section above for an example.
Polar Alignment
If you have an equatorial mount then you will need to polar align your mount.

Equatorial Mount. German type.

Equatorial mount in relation to the celestial sphere.
The diagrams above show the example of a German equatorial mount. The polar axis of the mount needs to point at the celestial pole. In the northern hemisphere that point is very near the North Star (Polaris). The precision of the alignment will depend on your own needs. If you're just using it for visual observations, the alignment can be very rough and still be adequate. But if you're setting up for long exposure (over 1 minute) imaging, then the precision will need to be much greater.
Accurate polar alignment is beyond the scope of our Beginner's Guide, but you can read a very good technique presented by Sky & Telescope by clicking/tapping here.
Pointing Your Telescope
Being able to successfully point your telescope at celestial objects is necessary for you enjoy your instrument. Too many beginners don't learn one of the finding methods and so their telescope goes unused.
Sighting Along the Tube
Though it is possible to find bright objects just be using the telescope tube as a guide, this is not something you should rely on. But it is sometimes necessary: 1) Your finder scope is hopelessly out of alignment and you need to realign it. 2) You need to sync your GoTo scope and it doesn't have a working finder.
Setting Circles
 Before the Dobsonian revolution most amateur telescope came on an equatorial mount and setting circles were almost always included.
It was as if they were a totally necessary part of the telescope. We are not going
into detail on them because they are becoming increasingly rare and not included with equatorial mounts and not really ever available as an add-on.
This is too bad because the theory in their use was almost magical: you simply dialed in the coordinates (Declination and Right Ascension) of your
target object and it should them be in the eyepiece of your telescope.
Before the Dobsonian revolution most amateur telescope came on an equatorial mount and setting circles were almost always included.
It was as if they were a totally necessary part of the telescope. We are not going
into detail on them because they are becoming increasingly rare and not included with equatorial mounts and not really ever available as an add-on.
This is too bad because the theory in their use was almost magical: you simply dialed in the coordinates (Declination and Right Ascension) of your
target object and it should them be in the eyepiece of your telescope.
 The issue with setting circles on smaller telescope mounts was that they were hopelessly too small for any precision in pointing. And since their whole
purpose was to help find things meant they were almost worthless. The
setting circles shown in the two photographs were very typical and they are
only 2.5 inches in diameter. You can see from the photo on the upper left how difficult it was to get a reading even within 5 minutes of
arc in RA and 1° in Dec. So finding anything with them was usually an exercise in frustration.
The issue with setting circles on smaller telescope mounts was that they were hopelessly too small for any precision in pointing. And since their whole
purpose was to help find things meant they were almost worthless. The
setting circles shown in the two photographs were very typical and they are
only 2.5 inches in diameter. You can see from the photo on the upper left how difficult it was to get a reading even within 5 minutes of
arc in RA and 1° in Dec. So finding anything with them was usually an exercise in frustration.
 But if they were large enough they would be very effective and easy to use.
At the Milwaukee Astronomical Society Observatory we have two telescopes
that have very large setting circles. At the left is a picture of the Buckstaff Scope which is a
12.5 inch Newtonian reflector. It has a Right Ascension (RA) circle which is 12 inches in diameter and a
Declination (Dec) circle which is 21 inches in diameter.
But if they were large enough they would be very effective and easy to use.
At the Milwaukee Astronomical Society Observatory we have two telescopes
that have very large setting circles. At the left is a picture of the Buckstaff Scope which is a
12.5 inch Newtonian reflector. It has a Right Ascension (RA) circle which is 12 inches in diameter and a
Declination (Dec) circle which is 21 inches in diameter.
Setting circles do need to be "aligned" in RA at the start of your observing session. Basically you put a bright star in the main telescope FOV which you know its RA. The RA circle always has the ability to "slip" so you can then dial in that right ascension. From then on (assuming the mount is being driven with a clock drive), that RA circle is set for the evening. The declination never changes so normally nothing there needs to be done.

Declination Setting Circle

Closeup - Vernier Scale
Digital Setting Circles / Push To
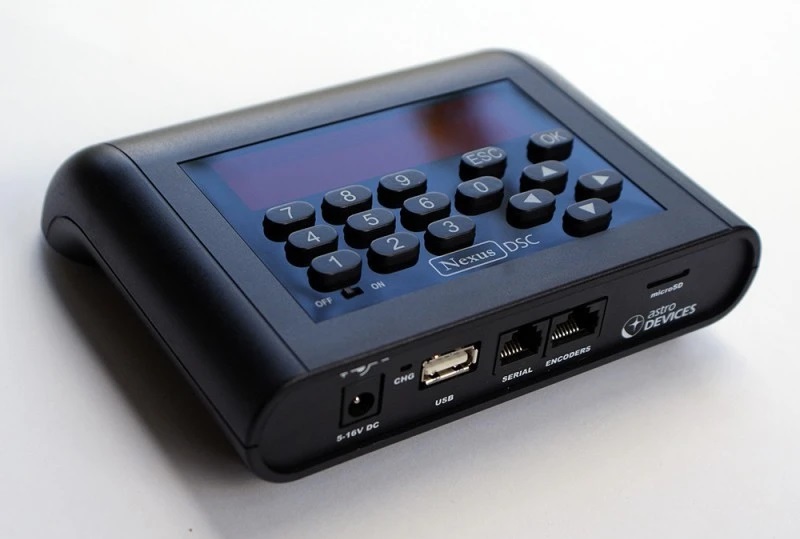 The concept of setting circles is still very good so now any telescope mount today can be fitted with digital setting circles (DSC).
These work with both equatorial or alt-azimuth mounts!
The concept of setting circles is still very good so now any telescope mount today can be fitted with digital setting circles (DSC).
These work with both equatorial or alt-azimuth mounts!
DSC's consist of two main items: 2 rotory encoders for the two mount axes and command unit which has a readout display and contains the computer with the database of celestrial objects. Though they can display the RA and Dec of exactly where the telescope is pointing, this is not how they are normally used. Like a GoTo telescope, you find the object you wish in the units database and then "push" the telescope to that object. Your digital readout shows how far you are away from that object in RA and Dec so you are trying to get both values zero or close to zero. The object should then be in the main telescope. Because this differs from the GoTo mount where it automatically slews the telescope to the object, DSC's are often referred to as "Push To."
Digital Setting Circles must be aligned just like a GoTo mount utilizing the "2 Star Alignment" technique that was explained above in the GoTo mount discussion.
GoTo Systems
We add this simply to make a complete list. Obviously if you have a GoTo system on your mount this is probably how you will find your objects.
Finders
Finders scopes are small telescopes with 7-11X magnification and 1X Finders are systems that "project" either a red dot or a target in the sky. Both of these systems requires an alignment operation which we discussed under the Utilize the Daytime section. Their function is in the name: to help find celestial objects in your telescope.
1X Finders are called that because they don't magnify. There are basically two systems: the Telrad which projects a target in the sky and Red Dot versions which are called that because they project a red dot in the sky. These have become very popular because they are intuitive and so easy to use they can be learned immediately. We have an in depth discussion on locating objects with a 1X finder in our Starhopping page.
Standard Finders are small telescopes that magnify 7-11X and always have some sort of crosshairs to mark the center of the field. In the time before the 1X finders because popular, telescopes for beginners and intermediate observers always came with a magnifying finder scope. They worked well enough, but they inverted the image (in straight-thru models) or they created a mirror image (those with a right-angle diagonal) so they were difficult to use. Today you can get a straight-thru finder with that has an erect view, and the right-angle finders almost universally show an erect view that's not a mirror image. We have an in depth discussion on locating objects with a finder scope in our Starhopping page.